|
>>>>>>>>> |
|
>>>>>>>>> | ||
|
|
||||
| Step 1)
Set up a website using Windows IIS There are many internet articles detailing how to install the IIS web server, so I won't go into it here. A quick google search will turn up articles such as:- https://teckangaroo.com/enable-iis-windows-10/ Creating an IIS website on a PC is very easy. All that's needed is to move the files in C:\inetpub\wwwroot into a new sub folder called, say, "original", then copy a html or other suitably named web page into the C:\inetpub\wwwroot folder. |
||||
|
|
This ZIP file contains
a sample html script and graphics for a web
page.
Simply unzip it and copy the 3 files into the C:\inetpub\wwwroot folder. sample_site.zip |
|||
|
To check the page displays correctly, just type localhost into a web browser. |
||||
|
|
||||
|
NOTE: If
there are other applications running on the host computer that use
the default http port 80, it may be necessary to change the IIS binding
port
to something else between, say, 49152 and 65535. To change the binding port start the IIS console (normally installed at C:\Windows\system32\inetsrv\InetMgr.exe) and click on the default web site in the Connections pane, then click Bindings in the Actions pane. Highlight the http entry in the Site Bindings window and click Edit. Change the port number in the Edit Site Binding window and click Ok. Make a note of this number as it will be needed for setting up the firewall and port forwarding later. Close the IIS console. For suitable port numbers see: https://www.meridianoutpost.com/resources/articles/well-known-tcpip-ports.php |
||||
 |
||||
|
|
||||
| Step 2)
Setting up the windows firewall Normally, the IIS default binding port 80 is automatically allowed through the firewall, (World Wide Web Services (HTTP Traffic-In)) but in the unlikely event it isn't, or the IIS web server's binding port has been changed (see above), an exception must be added for the new port number. To add the exception, start the firewall console (normally installed at C:\Windows\System32\WF.msc) and in the left hand pane click Inbound Rules. In the right hand Action pane click New Rule. In the New Inbound Rule Wizard window, select Port, and click Next. |
||||
 |
||||
| Select TCP and Specified local ports.
Enter the port number you set as the Binding port in IIS and click Next. |
||||
 |
||||
| Select Allow the connection and click Next. |
||||
 |
||||
| Make sure Domain, Private and Public are ticked and click Next. |
||||
 |
||||
| Type in a name for
the rule such as "@ My Web Site
Rule" and a description and click Finish. Using a character such as @ or $ at the start of the name ensures the rule shows at the top of the firewall console Inbound Rules list. (When sorted by name order) |
||||
 |
||||
|
|
||||
NOTE: Although this guide is primarily intended for a Windows setup, it's easy enough to install an Apache web server on a Linux machine and use the example steps below to test the installation. There are many internet articles detailing how to install Linux etc, so I won't go into it here. After installing, say, Ubuntu, install the web server: Install and Configure Apache Web Server on Ubuntu 20.04 https://linuxhint.com/install_apache_web_server_ubuntu/ Sometimes, you may need to run Apache on a different port because you need to run reverse proxy on port 80. Here’s how to change port number in Apache in Ubuntu. How To Change a Port Number in Apache in Ubuntu https://ubiq.co/tech-blog/how-to-change-port-number-in-apache-in-ubuntu/ Common Firewall Rules and Commands https://ubiq.co/tech-blog/how-to-change-port-number-in-apache-in-ubuntu/ Once the web server is up and running, the steps below will enable internet access. |
||||
|
|
||||
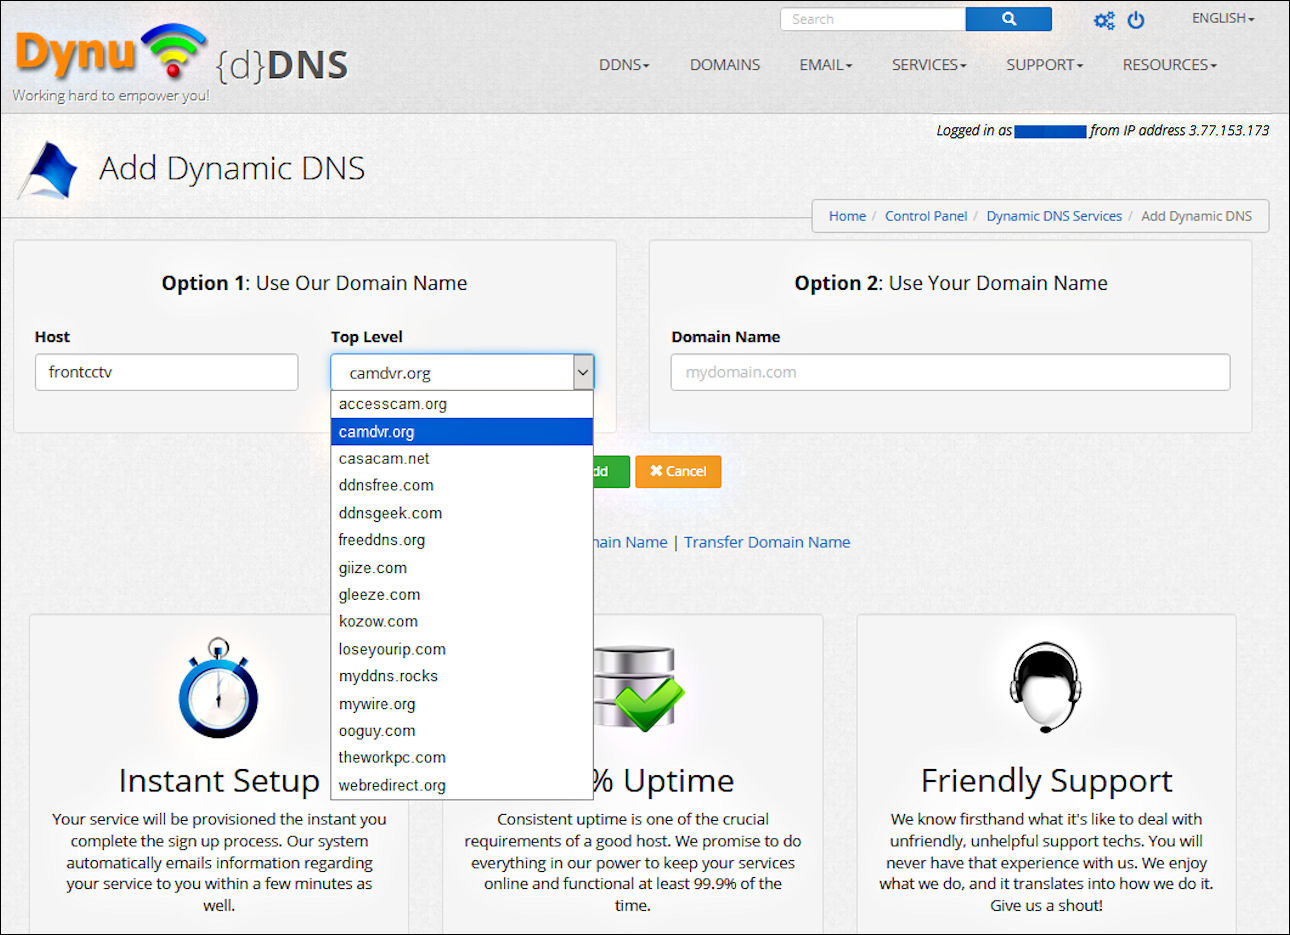
| Step 3)
Set up a domain name on Dynu.com Create an account on Dynu.com and login. Click the control panel icon that looks like 3 gearwheels  at
the top-right, then click on the DDNS
Services icon at
the top-right, then click on the DDNS
Services icon  Click  and
fill in option 1 to create a free domain name, or option 2 if you
already have your own registered domain name. and
fill in option 1 to create a free domain name, or option 2 if you
already have your own registered domain name.Click  |
||||
 |
||||
| You will be redirected to the Dynamic
DNS Management page. You can add your own notes by clicking on Notes at the bottom of this
section. |
||||
 |
||||
|
If
there are multiple devices and applications (such as an Apache web
server running on Linux) on your home network that use the external
port 80, or port
80 is being used internally by your hub (for remote administration
etc), it's advisable to add a Web
Redirect port to the domain
name. This is good practice anyway and ensures that someone can find your web site just by typing the domain name, otherwise they could end up staring at your hub's login admin page. To add a web redirect, click on the domain name you have just created, then the Web Redirect icon  Add www under Node Name, set the Type to Port Forwarding, and change the Port to something like 9050. It must NOT be something that is already assigned as an External Port to another device or application in the IPv4 Port Mapping section of the hub. Click  Repeat the process but this time leave the Node Name blank. The page should look like this example below. |
||||
 |
||||
|
|
||||
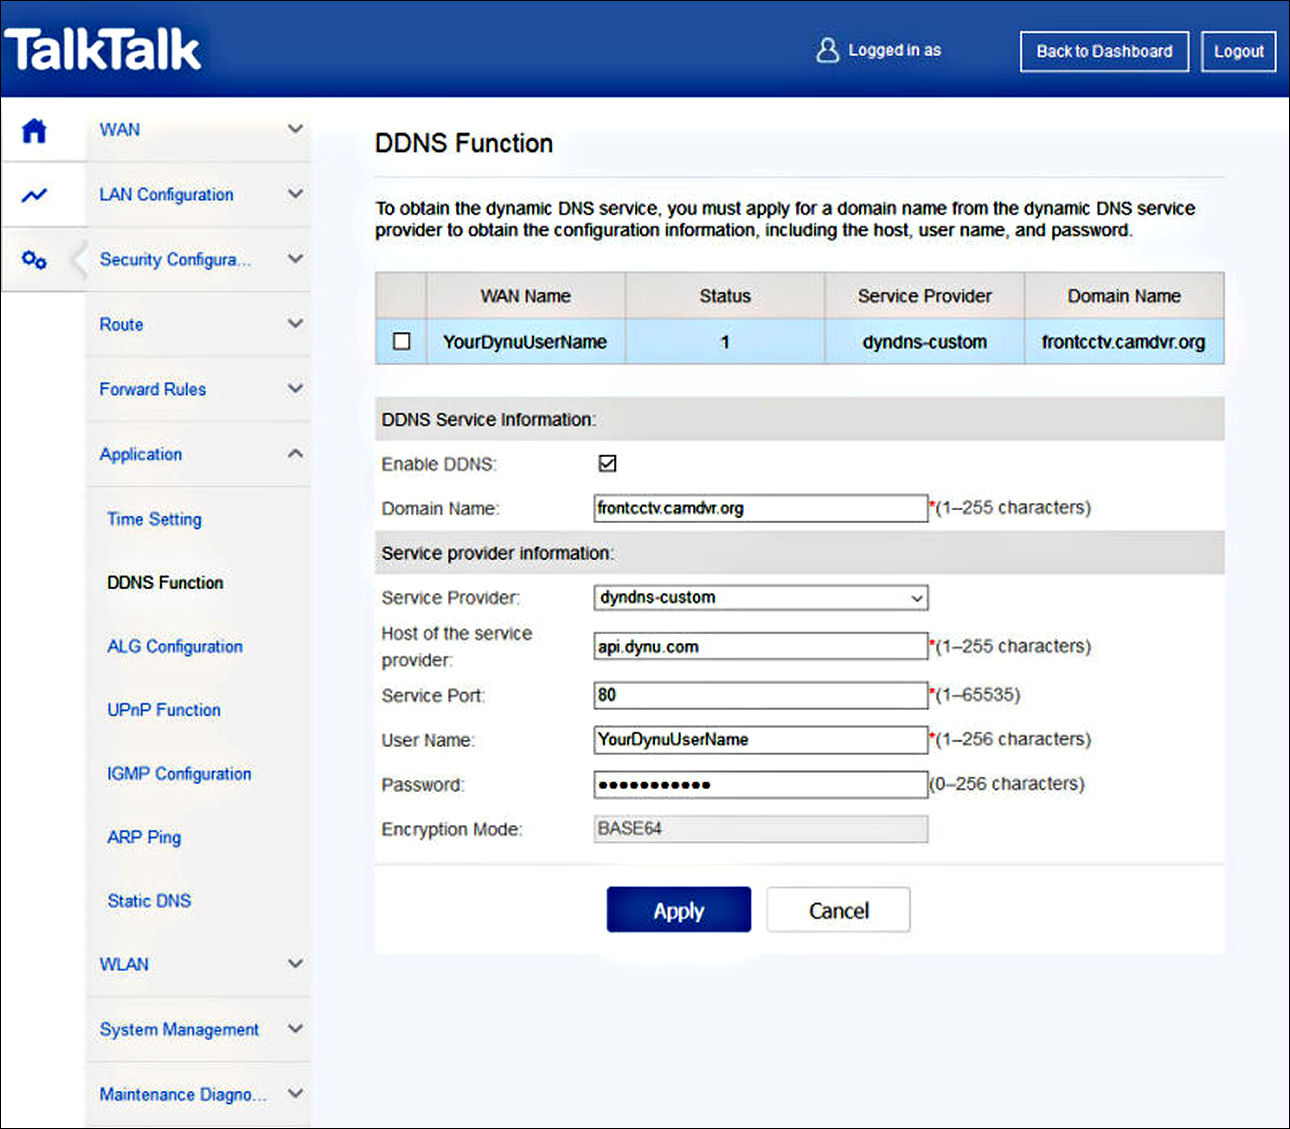
| Step 4)
Set up the Huawei Echolife DG8041W Hub Setting a Reserved / Static IP In order to easily access the Web Server over the LAN, it will be necessary to either give it a reserved IP in the hub or a static local IP address in the Windows network configuration. To reserve the machine's IP in the DG8041W hub, login and go to See Internet Settings > Manage Advanced settings > System Info > User Device Informatiom. Tick the machine that is hosting the web server and click Reserve IP. The setting will be saved in See Internet Settings > Manage Advanced settings > Advanced Configuration > LAN Configuration > DHCP Static IP Configuration. Setting a static IP in Windows is well documented so I won't go into it here. A quick google search will turn up articles such as:- https://kb.netgear.com/27476/How-do-I-set-a-static-IP-address-in-Windows Setting up DDNS with Dynu.com Login to the hub, click on See Internet Settings > Manage advanced settings > Continue, and navigate to the DDNS Function page. Click on the entry under WAN Name and enter the domain name (without the node prefix) you created in the Dynu control pane. Change the Service Provider to dyndns-custom, the Host of Service Provider to api.dynu.com and the Service Port to 80. Add your Dynu username and password. Make sure Enable DDNS is ticked and click  IMPORTANT: Whenever a change is made, the password MUST be re-typed afresh. DO NOT rely on copy/paste. The password field gets filled with random characters when the "DDNS Function" page is loaded, so saving the page without re-typing the password forwards the wrong password to the DDNS provider. |
||||
 |
||||
| Note: The Host of service provider and Service Port fields are editable, so you can set the Service Provider field to anything you want, as it is only used for display purposes and to insert example settings into the Host of service provider and Service Port fields. However, for the sake of clarity, it is perhaps best to use the Service Provider field that has "custom" in its name. See: https://www.dynu.com/DynamicDNS/IPUpdateClient/HUAWEI-HG8245-HG8346M-HG8045H |
||||
| Setting
up Port Forwarding Navigate to the IPv4 Port Mapping page and click  Select User Defined, enter a Mapping Name and the IP address (Internal Host) of the device hosting the IIS web server. Set the Protocol to TCP, the Internal Port to the binding port of the web server (usually 80) and the Web Redirect port (Start & End External Port) specified in the Dynu Web Redirect page, and click If you have NOT set up a Port 80 Redirect, set the Start External Port to ZERO and the End External Port to 80. |
||||
 |
||||
|
|
||||
| Step 5)
That's it - Test & navigate to your web site The Huawei Echolife DG8041W hub supports Nat Loopback, which makes accessing your website from the host computer straightforward. To access your site from the world wide web, use a mobile phone with the WiFi switched off and use the domain name you created (e.g. frontcctv.camdvr.org ) in Dynu. To access your site from the host computer, type any of the following into a web browser: 1) localhost 2) the domain name you created (e.g. frontcctv.camdvr.org ) (NAT Loopback) 3) the computer's IPv4 IP address (e.g. 192.168.1.23 ) 4) the computers WAN IP followed by a colon and the forwarded port address (e.g. 3.77.153.173:9050 ) (NAT Loopback) 5) If the web binding port has been changed from the default of 80, use the computer's IPv4 IP address followed by a colon and the web server's binding port (e.g. 192.168.1.23:49160 ) To get your local IP type ipconfig into a command prompt on the web server host computer and look for the IPv4 address. To get your WAN IP and test the forwarded port go to https://www.yougetsignal.com/tools/open-ports/ enter your forwarded port number and click Check |
||||
| NOTE: THE WEB SERVER MUST BE LOADED AND RUNNING
FOR A PORT FORWARDING CHECK TO WORK. The tool MUST be able to drill down to the PC. Simply creating a port forwarding rule in the hub will report as a closed port if the Web Server isn't running. i.e. it's the equivalent of trying to check for an open port on a computer that isn't switched on. |
||||
|
|
||||
| Other tools: Google Admin Toolbox: https://toolbox.googleapps.com/apps/dig/#A/ Dynu Toolbox https://www.dynu.com/en-US/NetworkTools Common DNS Return Codes: https://support.umbrella.com/hc/en-us/articles/232254248-Common-DNS-return-codes-for-any-DNS-service-and-Umbrella- |
||||
|
|
||||
|
Explanation of DNS Host (A), DNS Host (Round Robin), CNAME, Port 80
Redirect, Web Redirect, Assign to Groups, Enable Wildcards https://www.noip.com/support/knowledgebase/configure-ip-hostname/ |
||||
|
|
||||
Error Message: "The configured port conflicts with the internal service port" (DG8041W Port Forwarding) |
||||
 |
||||
| While
technically true, this cryptic message simply means the specified
external ports are restricted. Most residential ISP's modem/routers block ports to combat viruses / hijacked PC's. To avoid seeing this message, either select different external ports or set both fields to 0 (zero). Setting both external ports to zero exposes all external ports - including the ones that raise the error message. You can also set the "Start External Port" to 0 and the "End External Port" to whichever port results in the error message (e.g. 80) However, be aware that setting the external ports to zero may have unexpected consequences for game servers etc, that are installed on the host machine. You should only really do this for testing purposes. The best options are to use port redirection at the DDNS provider or buy your own unrestricted modem/router. |
||||
 |
||||
| Tested and verified: | |
|||
| |
1) Web Server (HTTP)
|
external port fields pre-loaded with an example value of:- | 80 | |
|
2)
Web Server (HTTPS)
|
external port fields pre-loaded with an example value of:- | 443 | ||
| Tested but NOT verified: | ||||
|
1) Domain Name Server
(DNS)
|
external port fields pre-loaded with an example value of:- | 53 | ||
|
2) Secure Shell Server
(SSH)
|
external port fields pre-loaded with an example value of:- | 22 | ||
|
3) Telnet Server
|
external port fields
pre-loaded with an example
value of:-
|
23
|
||